Ben Vanheems shares some essential tasks to carry out in your garden and allotment for February.
SOW NOW
Aubergine, broad beans, broccoli, Brussels sprouts, summer cabbage, carrots, cauliflower, chillies, cucumber, kohl rabi, leeks, lettuce, onions, peas, peppers, radish, salad leaves, spinach, spring onion, tomato, turnips
PLANT NOW
Garlic, Jerusalem artichoke, rhubarb, shallots, soft and tree fruits
Enjoy more Kitchen Garden Magazine reading.
Click here to subscribe & save.
HARVEST
Brussels sprouts, winter cabbage, cauliflowers, celeriac, chicory, endive, Jerusalem artichokes, kale, leeks, parsnips, sprouting broccoli, swedes, winter radish, winter salad leaves
Plant garlic
Didn’t get a chance to plant garlic last autumn? Get on and do it now, but only if your soil isn’t frozen or saturated. Otherwise, set cloves into modules or pots to plant out in spring.
Turn compost
Fork through or dig out then restack compost heaps and bins. This introduces air, which will help to reinvigorate your heap and speed up decomposition.
Order asparagus
Asparagus is the royalty of vegetables. Order in some crowns to plant in March. Prepare ground now by digging in plenty of well-rotted compost.
Prune raspberries
Cut autumn-fruiting raspberries back to ground level ready for new cane growth in spring. Trim summer-fruiting canes so they are no taller than their supports.
Choose and chit potatoes
One of the most rewarding vegetables to grow is the humble spud. Potatoes are the reliable go-to for so many meals, and they’re reliable in the garden too. Now is the time to get your seed potato order in and start sprouting or ‘chitting’ on delivery in preparation for planting.
Consider what you want from a potato: fluffy textured for roasties and mash, or a firm, waxy type for salads? Check descriptions and look for other winning attributes such as blight tolerance and scab resistance. With the right selection you could be harvesting tubers from May to October. Set your seed potatoes out in a bright, cool but frost-free position so most of the eyes (dimples in the potato) face up. Egg boxes make perfect spud-sized supports for your chitting tubers. New shoots will sprout within a few weeks ready for planting in spring.
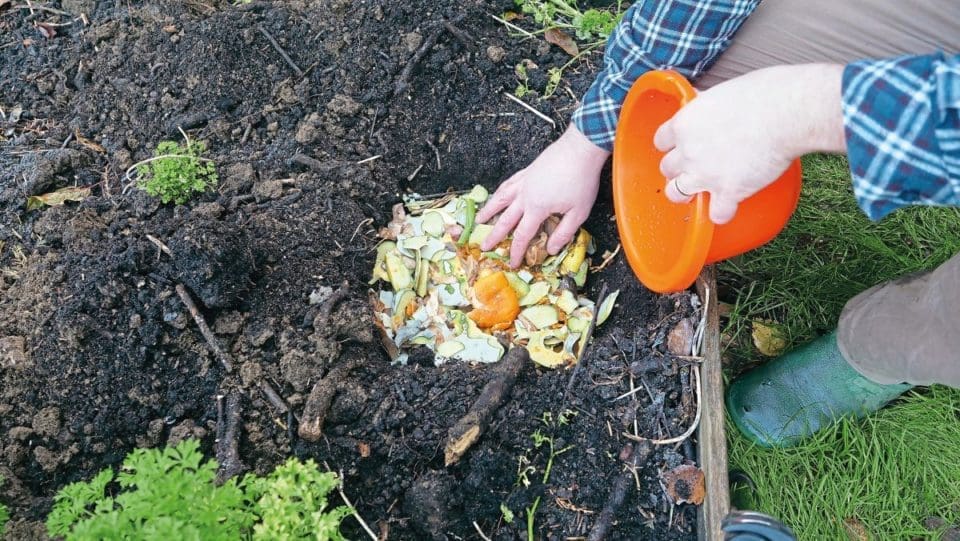
Prepare compost pits
Heavy feeding crops like beans, squashes and courgettes love getting their roots into a reservoir of moist, nutritious organic matter. One way to achieve this is to create compost trenches or pits a few months in advance of planting. Dig a trench or hole around 60cm (2ft) deep where your crop is to grow. Fill it with compostable kitchen scraps, either in one go or in stages, following each addition with a layer of soil to keep it covered. Once complete you may want to mark the position of the pit so you know exactly where to plant in May. Do not add any cooked foods, meat or dairy, which might attract vermin or invite foxes to dig.
Prepare seedbeds –
STEP 1: One way to get a head start on spring is to create a stale seedbed, where dormant weed seeds are germinated then hoed off to leave clean soil for sowing. Start by covering areas with some form of protection to raise the temperature and encourage weeds into growth.
STEP 2: Temporary cold frames made using old windows supported on wooden planks held up by lengths of bamboo work well, or simply cover ground with clear plastic sheets. Once the weed seedlings are up, remove covers then hoe the weeds off on a dry, sunny day.
STEP 3: Seedbeds can be prepared a few weeks in advance of sowing. Once ready, keep the area covered to prevent other weeds from establishing. Cardboard is perfect for this and may be added to the compost heap after use to balance out green materials like the first grass clippings.
Pests & Problems
■ Bullfinches: Protect fruit bushes like gooseberries from bullfinches, which love to peck at the buds. Well-placed netting should do the trick. Offer hungry birds alternatives instead: oil-rich seeds, fat balls (mesh removed) and quality food scraps are all welcome.
■ Slugs: Even in winter slugs can prove a nuisance. Check overwintering crops for slugs and pick off any you come across. Remove slug hiding places from around vegetable beds ready for spring. Planks of wood on the ground, old pots and other debris are typical haunts.
■ Damping off: This is the sudden collapse of seedlings and is caused by fungal organisms. It is common in early sowings made under glass. Avoid problems by raising seedlings in freshly bought compost. Don’t sow too thickly, use tap water, and keep areas well ventilated.
Action stations!
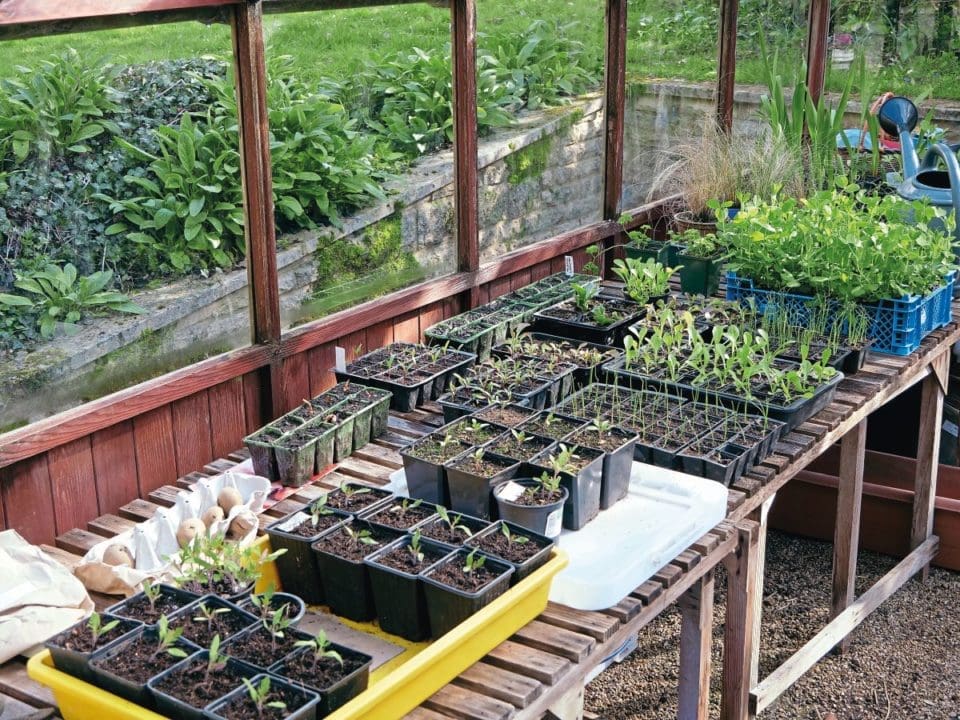
Greenhouse benches will soon be groaning under the weight of seedlings and young plants. Setting yourself up for a stress-free start to spring means getting your ducks in a row.
All of my propagation is completed while sitting comfortably at a desk in the corner of the greenhouse. The desk drawer holds everything necessary for the job: labels made from cut-down yoghurt pots, pencils and pens, a wooden dowel to dibber holes and a teaspoon to handle seedlings. Bags of seed and multi-purpose compost are kept under the staging, with a lidded plastic tub of compost kept on the desk for ready access.
Setting up a system with everything in easy reach makes the whole task of sowing, pricking out and potting on a cinch. Don’t forget stacks of clean module trays and pots too. If they are still dirty from last year, get on and clean them now before the spring rush gathers pace.
Grow pea shoots
It’s a while before plumptious pea pods are on the menu but mere weeks for pea shoots. Sow a few seeds per module to plant outside in a few weeks or broadcast sow into wide, shallow trays. Mushroom crates are ideal and can often be picked up for free. Line them with a few layers of newspaper to stop the compost washing out then pack in some multi-purpose compost. Sow the seeds thinly across the surface then cover with a little more compost. Water thoroughly then keep moist. Harvest when the shoots reach about 20cm (8in) tall, cutting to about half height, just above a leaf node, to encourage further shoots to develop.
Sow peppers and aubergines
STEP 1: Aubergines, peppers and chillies are heat-loving crops that need as long a growing season as you can muster. Reliable results are only possible with lots of warmth and an early sowing. Start by filling pots with a seed compost then sow the seeds about an inch apart across the surface.
STEP 2: Cover the seeds with compost to a depth of about 1cm (1⁄2in) then either place pots into a heated propagator or cover the pot with a layer of clear film, held in place with an elastic band. Germinate at a warm room temperature – 20-25C (68-77F) will give the speediest germination within about 10 days.
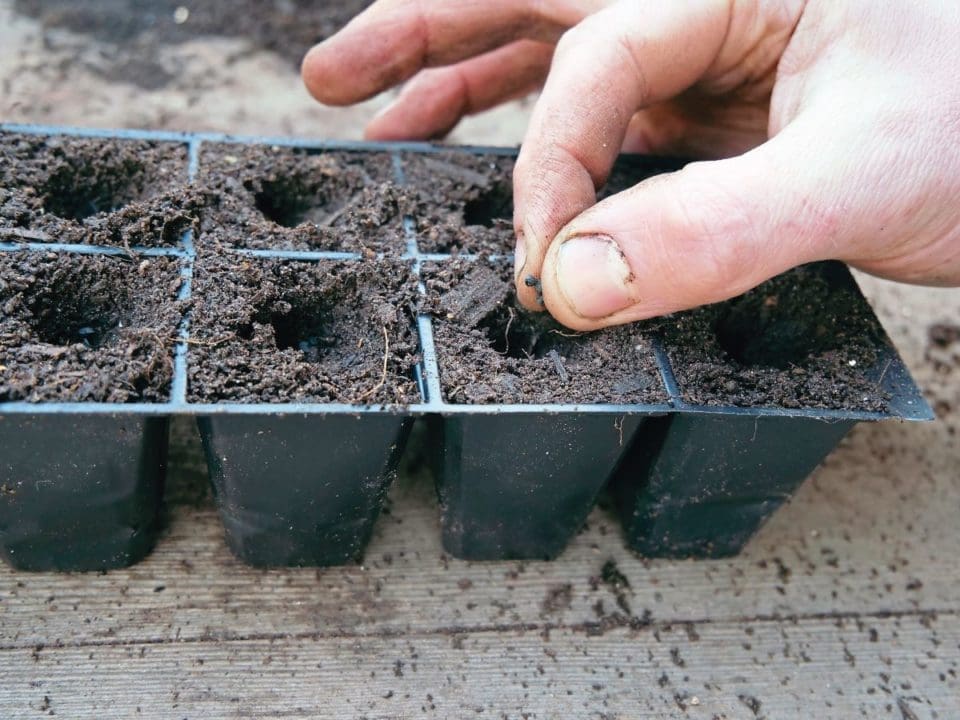
STEP 3: Once the seedlings are up and have grown on a little, carefully remove them from their pot and tease them apart. Holding the seedlings by their leaves only, transfer them into waiting pots of multi-purpose compost. Lower them into a dibbered hole and gently fill in around the seedling.
Sow onions
Starting onions off from seed is a lot cheaper than buying in sets. Seed-raised onions also tend to be of a better quality, suffer less chance of bolting and store better.
Sow seeds into modules of seed or sieved multi-purpose compost about 1cm (1⁄2in) deep. You have two options: sow a couple of seeds per module then thin to leave the strongest for planting out as individual onions, or sow a pinch of around five to six seeds to grow on as a cluster of seedlings.
This is my preferred method, with clusters planted out at a distance of about 25cm (10in) each way. Individual onions can then be twisted free, or the entire clump lifted at once.
Key Jobs for February
■ Make a hotbed
Hotbeds are a natural way to provide a gentle source of heat during the colder months. Stack organic materials like straw and manure that will heat up as they rot down to create a snug environment within your greenhouse or polytunnel that gives early sowings a boost.
■ Improve airflow
Even in February sunny days can lead greenhouse temperatures to soar. Warm weather can encourage a sudden spurt of soft growth which is then vulnerable to a sudden cold snap. Aim for consistent conditions by opening up doors, vents and windows on sunny days.
■ Check temperatures
Keep an eye on the temperature inside protected structures and propagation areas. Consider investing in a max-min thermometer to record the extremes achieved. Install your thermometer out of direct sunshine and clear of draughts to ensure an accurate reading.
■ Set up grow lights
Grow lights offer superior light quality for seedlings and young plants at this gloomy time of year. Position the lights so they hang 10-20cm (4-8in) above the seedlings and consider adding a timer if you won’t be around to switch the unit on and off. LED lights are a lot cheaper to run.