Ben Vanheems shares some essential tasks to carry out in your garden and allotment for January.
SOW NOW
Broad beans, cauliflowers, onions, pea shoots, radish
PLANT NOW
Garlic, soft and tree fruits
Enjoy more Kitchen Garden Magazine reading.
Click here to subscribe & save.
HARVEST
Chicory, celeriac, Brussels sprouts, winter cabbage, cauliflowers, Jerusalem artichokes, kale, leeks, parsnips, sprouting broccoli, swedes, winter radish, winter salad leaves
Top Jobs for January
Force rhubarb
Pop a forcing pot, bucket or a large pot with the drainage holes covered over rhubarb crowns to force an earlier crop of tender, pale stems.
Plant fruit
Continue planting fruit trees, bushes and canes, but only if your soil isn’t saturated or frozen. Mulch around the area after planting.
Melt icy ponds
Every kitchen garden benefits from a pond. Fish-free ponds are a boon for wildlife like frogs, toads and birds, which will repay your efforts by keeping pests such as aphids and slugs in check. During winter, frogs and occasionally newts lie dormant at the bottom of ponds, while birds need access to water to drink and preen. Ponds can ice over in cold snaps, removing a valuable source of water and leading to a potential build-up of toxins beneath the ice. Make a hole in the ice by resting a saucepan of boiling water on the surface till it melts through. Don’t pour on hot water and never smash the ice, which could harm pondlife.
Force strawberries
The first strawberries of the year are one of life’s simple yet intense pleasures. Strawberries need a period of chilling to set them up for the coming year, after which they can be brought under cover to encourage earlier flowering – and an early crop. Tidy them up first. Cut off any dead material as well as any runners. Top-dress with fresh compost to give plants a boost. Once the plants start flowering help them along still further with a regular watering of liquid tomato feed. The combination of an early variety and this extra warmth could see you picking fruits by the end of April or early May.
Prune trees
Winter prune apples and pears, remove any crossing branches then concentrate on the three Ds: dead, damaged and diseased wood.
Plan ahead
Work out what to grow where next growing season. Aim to try something new and bear in mind the principles of crop rotation.

Love your soil
Soil doesn’t like to remain uncovered for long. Now is a great time to top up mulches if you haven’t already done so. And it couldn’t be simpler: tip out barrowloads of well-rotted manure or garden compost on to the soil surface, rake it out then leave for the frosts and worms to break down and incorporate. Aim to cover ground to a depth of at least an inch or a couple of centimetres.
No-dig methods – where the soil isn’t turned over by the fork or spade – soon pay dividends. By simply leaving your organic matter on the surface rather than digging it in, the undisturbed soil has a chance to build up a more intricate network of beneficial organisms that help plants grow. Both drainage and water retention improve too, so that in very wet conditions the soil is less prone to waterlogging, and in drier weather it will hold on to moisture for longer. The best of both worlds!
Set up new raised beds –
STEP 1: Raised beds are great for growing vegetables on less-than-perfect ground, and because they are raised will dry out and warm up sooner in spring. Old pallet collars make excellent, ready-to-go beds. Begin by perfecting their layout, leaving enough room for paths.
STEP 2: If your garden is on a slope, dig out along the back of each bed and into the slope so that the bed sits level. Use a spirit level to check or if you haven’t got one, download a free spirit level app to your phone. Getting the levels right is worth the effort because it stops water running off.
STEP 3: Now fill your beds. If you are worried about weeds start with a layer of plain brown cardboard along the bottom. You can then part-fill with old sticks, prunings and kitchen scraps, before filling to the top of the bed with compost – I’m using green waste compost here.
Clean the greenhouse
Sowing begins apace in the coming weeks, so give your seedlings the best possible start with a spot of spring cleaning. Cleared, cleaned and cleansed, your greenhouse will be purged of pests and diseases and, with all that dirt and algae gone, offer vastly improved light levels.
You don’t necessarily need to use lots of expensive chemicals, but you will need to be thorough. Set aside a mild day, especially if you have overwintering plants that need protecting as these will need to be moved outside along with everything else while you go about cleaning.
Work methodically, starting from the top of the structure. With everything brushed or washed down you can then sterilise the greenhouse using a greenhouse cleaning fluid.
STEP 1: Remove absolutely everything from the greenhouse: all plants, pots, detachable staging – the lot. This will help you to clean and sterilise every nook and cranny. Now start cleaning! Brush down every surface, pull up weeds and rake up any debris. Be meticulous in removing any rubbish for disposal.
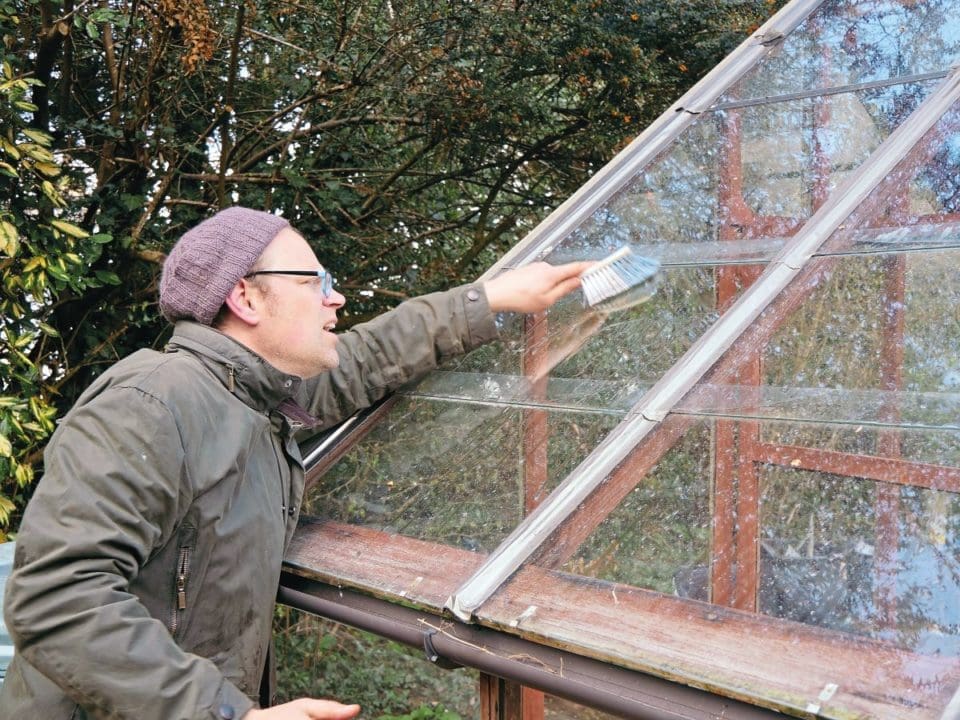
STEP 2: Wash the glazing, both inside and out. Scrub away any remnants of shade paint, as well as built-up dirt and algae. Get in between the panes using something flexible like a plant label or an (expired!) credit card. With the worst of the dirt removed you can now go about sterilising surfaces with a disinfectant.
STEP 3: Clean anything that has been moved out of the greenhouse. Blast clean staging and sterilise, taking care to reach the undersides and corners. Clean pots and tools. Allow everything to dry off before moving it back into the greenhouse. Admire your hard work. Now aim to keep it looking like that!
Sow broad beans
If you’re itching to get sowing, try broad beans. They are incredibly hardy and started off now should give a crop as soon as June, leaving plenty of time for a follow-on crop such as leeks.
Sow individually into large module trays or pots, setting the chunky seeds a couple of inches deep. Water from above then keep the compost damp but never wet, as you don’t want the seeds to rot. Mice have infiltrated my greenhouse in the past, and I find the best way to protect the seeds is to keep trays and pots in open storage boxes with chicken wire secured around the top until they have germinated. The seedlings can be planted out in spring.
Key Jobs for January
■ Refresh beds
Refresh greenhouse or polytunnel beds. Dig out some of the old compost or soil and replace with a fresh layer of clean compost. This can help to prevent problems with nutrient depletion or disease build-up, particularly where the tomatoes are grown in the same area each year.
■ Clear gutters
If you haven’t already done it, now is the time to clean out greenhouse gutters. Run your hand along the gutter to scoop out leaves and moss. Downpipes will need clearing out as well. Slosh cleared gutters with water to finish the job. Pop the old leaves on to the compost heap.
■ Order seeds
Who doesn’t love perusing the seed catalogues?! Now’s the time to think about the coming growing season. Check stored seed packets and order fresh seed in good time to avoid disappointment. Check supplies of materials such as bamboo canes too. Buy now before the rush.
■ Ventilate
Damp, humid conditions are a breeding ground for disease. Open doors and vents on mild, sunny days to get some much-needed fresh air into your greenhouse. If the greenhouse is empty, leave everything open so that frosts can get in and work their cleansing magic.
Pests & Problems

■ Pigeons: Pesky pigeons can rip holes in brassicas such as kale and Brussels sprouts when food is thin on the ground. Keep plants safe by covering with netting at the first signs of damage. Support netting on canes capped by upturned pots or old tennis balls.
■ Rotten roots: Check on stored produce such as apples, carrots and spuds every week or so. Use your senses – if you smell something suspect or notice a suspicious liquid oozing from a container, investigate and remove the offending items immediately.
■ Storm damage: Heavy winds can rock supporting stakes loose and snap ties and branches. Put right any damage as soon as possible. Another Beast from the East? Clear large dumps of snow from greenhouses, tunnels and cold frames to prevent damage.